The importance of glue in the life of a carpenter or crafter goes beyond words. But this super-useful item is also a must-have in every household. Our home furnishings may be subjected to mishaps any, besides the normal wear-and-tear they undergo over the years. There are some damage for which you must seek professional help but for the not-so-serious ones you can provide a fix yourself. This is just such an example.
In this article we will teach you how to glue glass to wood, two of the most common materials found in any home. There is a wide range of decorative and functional items that come with this combination. So if you ever have to attach one on top of the other, you must know which is the best glue available for this purpose.
How To Glue Glass To Wood
- Clean both the glass and the wood surface thoroughly. A glass cleaner will be best for the glass. The wood will vary based on its coating.
- Spread the glue along the outside of the wood
- Lay down the glass correctly along the lines of the wood to avoid any movement (which creates smears).
- Press down the glass lightly until the glue sets
- Allow ample time for curing
Choosing The Right Glue For Glass To Wood
There are many types of adhesives available in the market. But to bringing glass and wood together in a tight embrace, you need a durable and long-lasting adhesive. We normally expect to use a glue, but in this case we actually prefer an epoxy!
Epoxy is known for its great tensile strength and excellent bonding properties. It’s not quite as user-friendly as glue, but it’s better with glass. In this section, we will give you a quick run-through of three types starting with the best.

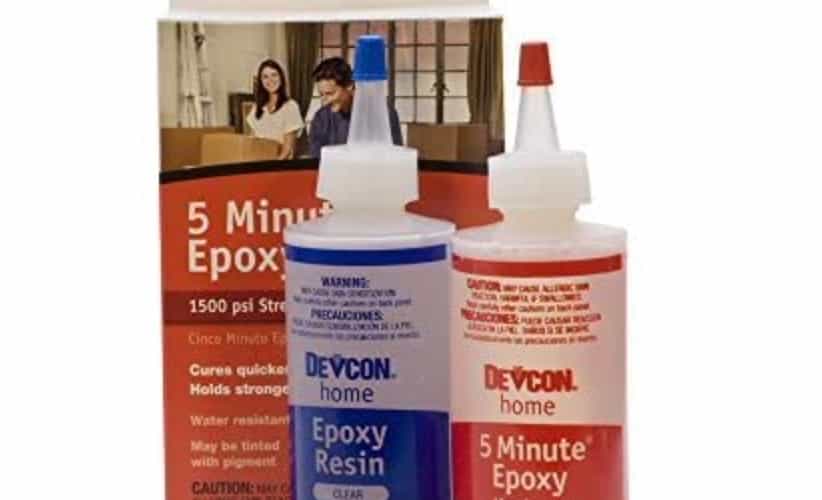
Best: Devcon 5-Minute Epoxy Waterproof Glue
Known for its quick-drying time and quick, high-strength bonding, Devcon waterproof epoxy is desirable for wood, glass, ceramics, concrete and metals. Although considered to be the best, it is also not without its shortcomings. Let’s look at its strengths and weaknesses to get a complete idea.
Strengths
- Forms a very strong bond, with working strength in just 15 minutes
- Resistant to chemicals
- Sets in 5 minutes, full-cure time of 1 hour
- Dries clear
- Easy to use and store
- NSN listed product
Weaknesses
- You need to combine the resin and the hardener in the right ratio for the mixture to work
- Once mixed, it needs to be used quickly.
- May cause skin irritation in some cases, so gloves and eye protection required
Alternative Solutions
In case the best one is unavailable, you may turn to the ones below.
PC Super Epoxy Quick Setting
This PC Super translucent epoxy comes in the form of a double-syringe applicator and is compatible with wood, glass, fibreglass, concrete and metal. It can also work as a sealant and a filler for a wide range of materials.
Strengths
- Versatile, flexible and forms a powerful bond
- Convenient to use as it comes with an injector and a dispensing gun
- Easy to store
- Fumeless
- Affordable
- Resistant to chemicals
- Strong enough to withstand drilling, sanding, painting and sawing after full cure
- Highly viscous
Weaknesses
- May cause skin and eye irritation
- Available in small quantity
- Does not blend in with the bonded material too well and is visible even after full cure
- Full cure time is between 3-7 days
Gorilla Clear Glue
Available in a squeeze bottle, this Gorilla Glue Clear bonds well without leaving any residue. It is available as a single bottle and requires no mixing. The applicator tip allows you to apply the glue with ease.
Strengths
- Non-foaming
- Affordable
- Forms a powerful bond
- Dries clear
- Water-resistant
- Ideal for both indoor and outdoor locations
- Works well with wood, glass, foam, ceramics etc.
Weaknesses
- Takes two hours to dry
- Needs clamping during the drying process
- Long cure time
- Non-resistant to heat
How To Use Devcon 5-Minute Epoxy
Step 1: Take a piece of paper. Depending on the size of your project, squeeze out a portion of the resin (one with a black lid) and the hardener (one with a white lid) separately in equal ratios onto it. Paper makes it easy to discard it after use relieving you of the hassle of cleaning up the workspace.
Step 2: Now, using a brush, or any other applicator start mixing them up well.
Step 3: Once they are mixed, quickly start applying this mixture along the edges of the wood as the glue starts to set quickly.
Step 4: Then, take the glass. Place it over the surface of the wood perfectly along its line and length.
Step 5: Hold them together for about 5-10 minutes, till it dries completely.
Step 6: It will take about an hour to cure completely.
So, contrary to popular belief, gluing glass to wood is not a complicated task at all. Only, if you know which product to use.

